contact us

Use the form on the right to contact us.

You can edit the text in this area, and change where the contact form on the right submits to, by entering edit mode using the modes on the bottom right.


123 Street Avenue, City Town, 99999

(123) 555-6789

email@address.com


You can set your address, phone number, email and site description in the settings tab.
Link to read me page with more information.

Blog

A Solution to the Age Old Problem: What Goes with Latkes?

Hope Korenstein

I know it’s been a while since I’ve been here, but I have some exciting news - I have solved the problem of what to serve with latkes at a Hanukkah party. I know that none of you had any idea that it qualified as a problem, but this is the stuff that occupies my brain.

Here’s some fighting words: the answer is not brisket. Sure, brisket with latkes is great, if you’re having a sit down meal. But if you’re having a latke party that involves cocktails and appetizers: no. Too heavy, and too hard to eat while standing and holding a drink. In my tiny apartment, brisket almost qualifies as a whole other guest, and I just don’t have the space.

And latkes, while utterly delicious, are also heavy, salty, oily, potato bombs that are a gigantic pain in the ass to make. Which means that whatever I serve with the latkes, in addition to being unfussy, should also be light, because my party hosting goals do not involve putting my guests into a food coma.

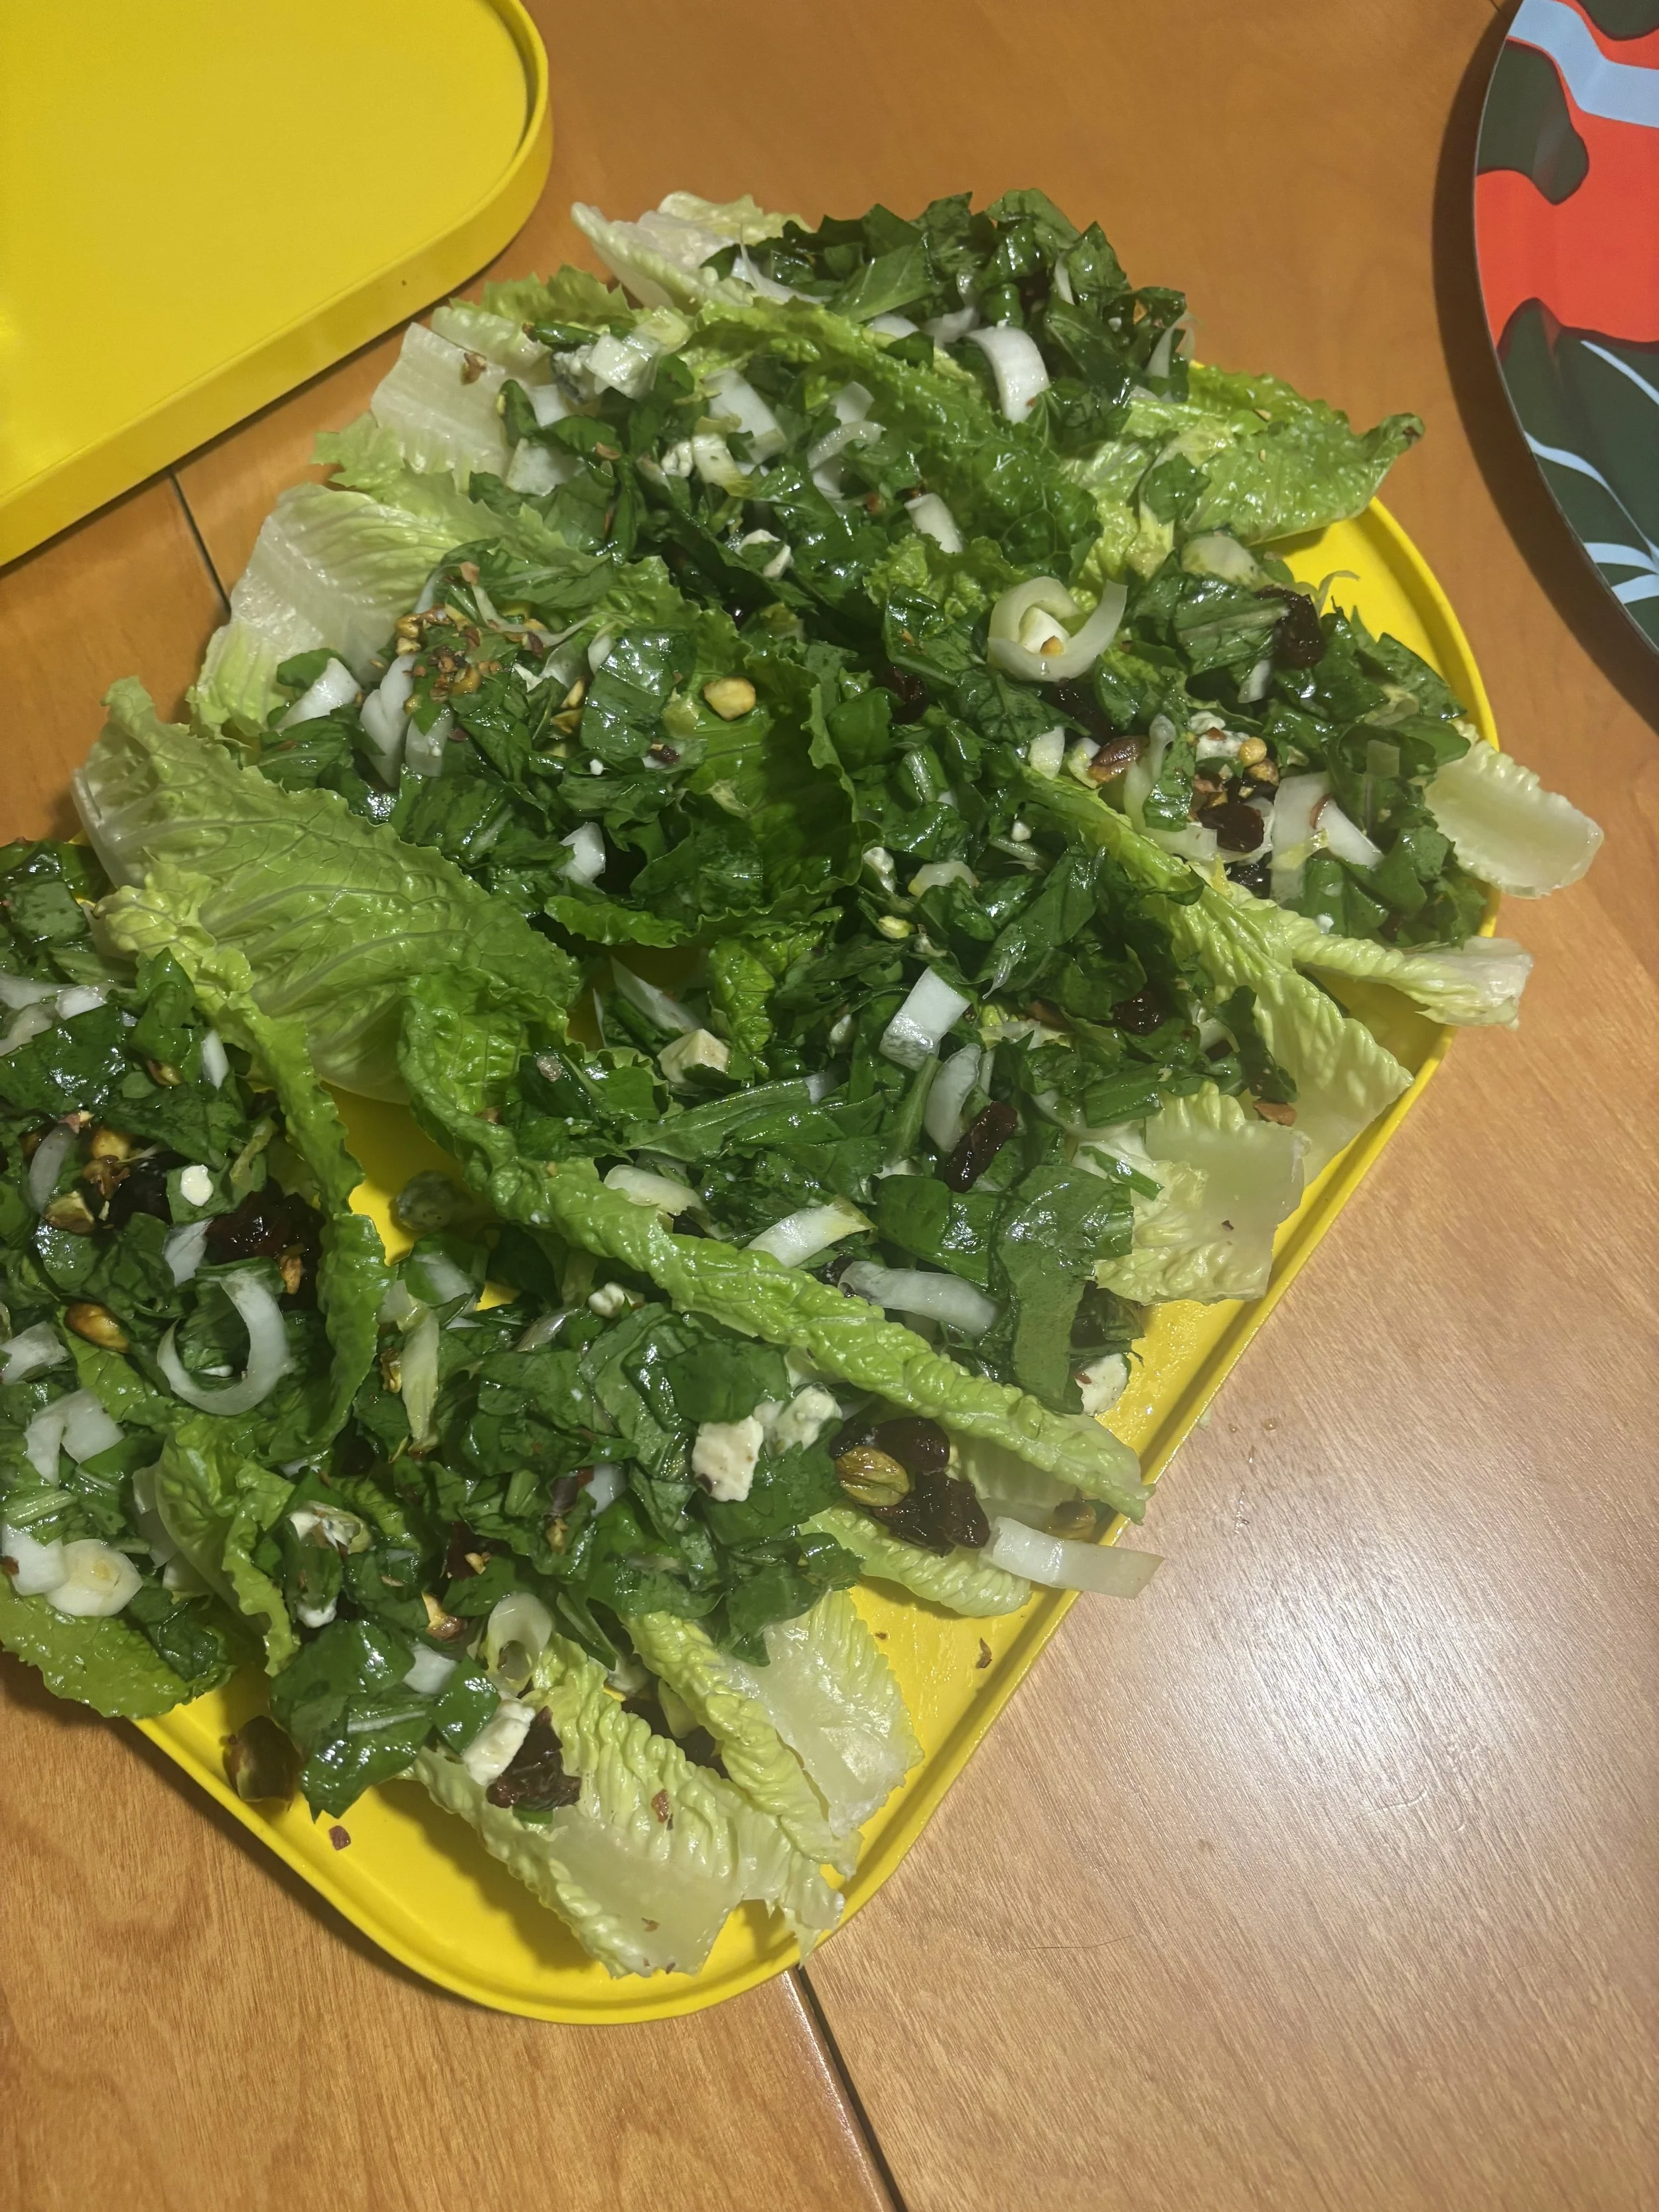
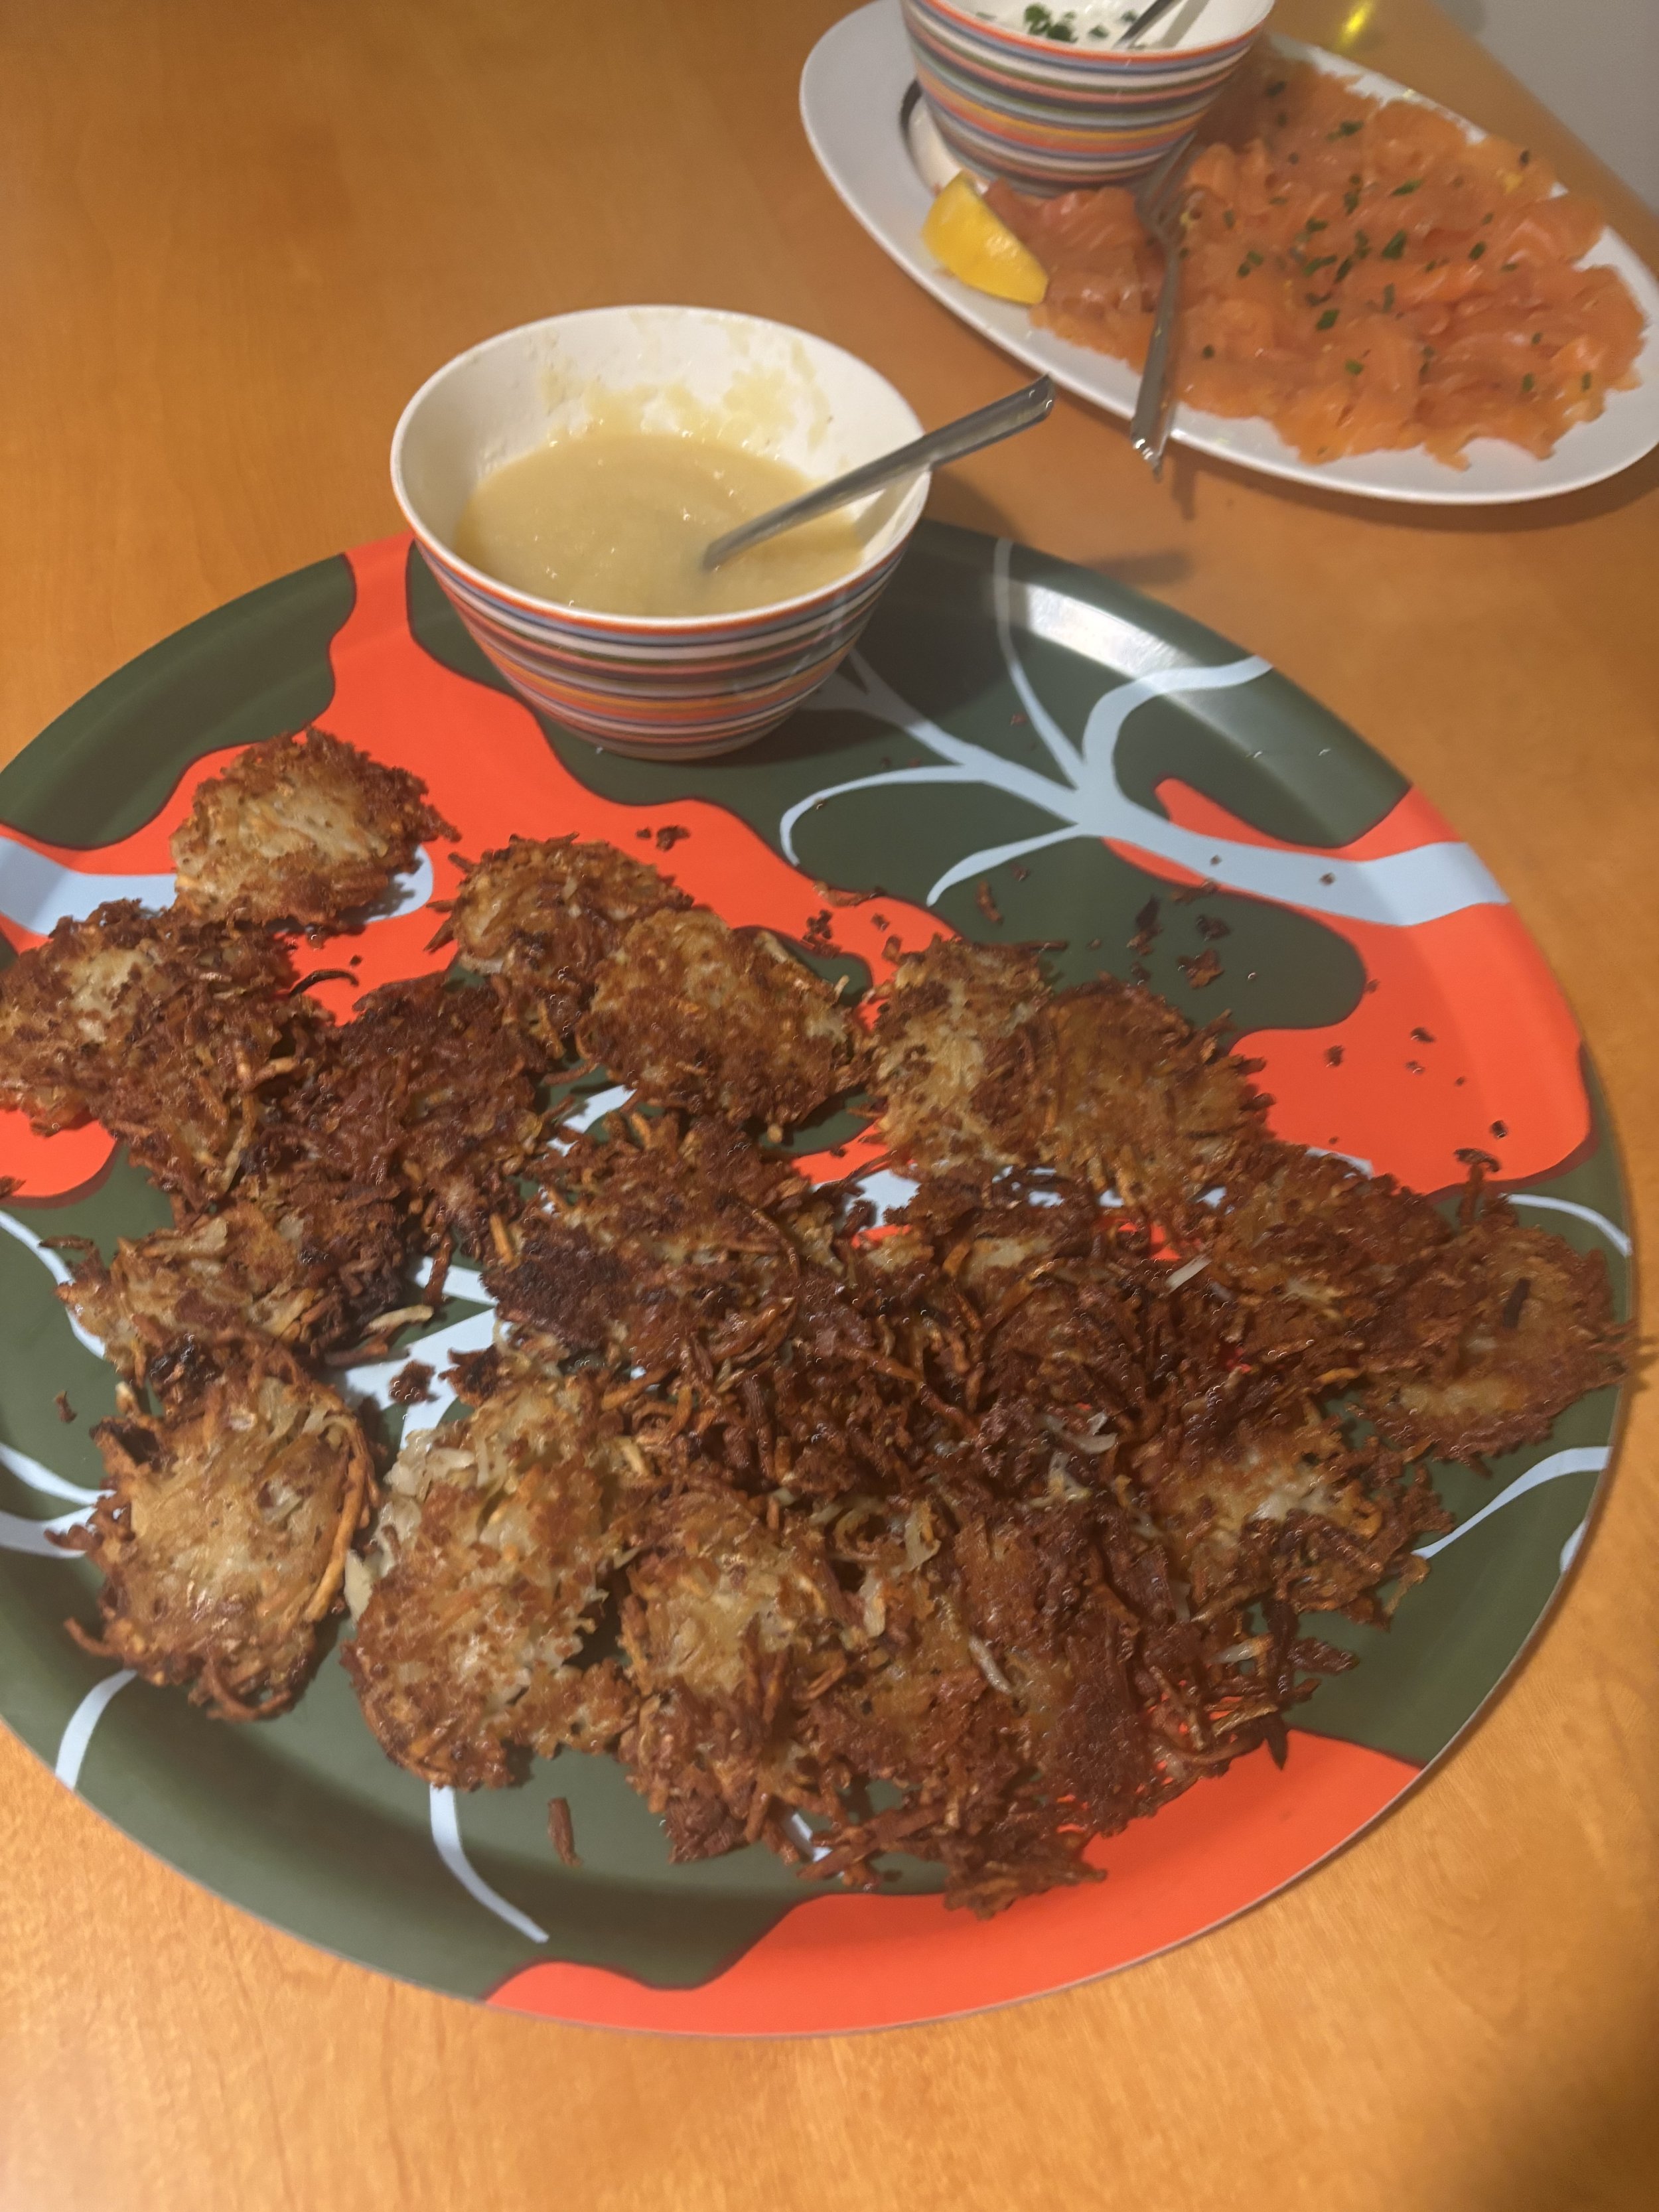
Here’s the spread I landed on to crack the code. Gravlax is easy to make — all you really need is time for it to cure in the refrigerator — looks impressive, and is fantastic on top of a latke with a horseradish sour cream. Shrimp cocktail, because what’s a Jewish party without some guilt-inducing traif? But the real surprise is that the other winners are the vegetables - not something you often hear me say. First, a bright handheld salad (!) in the form of romaine heart leaves filled with bitter greens, blue cheese, pistachios and dried cranberries in a citrus vinaigrette. And a spin on a Jacques Pepin tapenade, with surprises of lemon zest, dried figs and lots of fresh mint, on cucumber rounds. For dessert, store bought donuts, natch.

On last thing: I made the latkes the day before and froze them. They heated up beautifully. My new trick is to dunk each pancake in some panko before frying it, so that it crisps up even more in the oven the next day. I highly recommend the early fry-freeze-reheat approach - it really beats the hell out of standing at your stove, frying latkes, while your friends are hanging out and having fun.

Olive-Fig Tapenade on Cucumber Rounds

Olive-Fig Tapenade on Cucumber Rounds

1/2 cup oil cured olives

1/2 cup pitted Kalamata olives

6 dried figs, roughly chopped

1/4 cup olive oil

zest and juice of one lemon

1/3 cup of fresh mint, chopped

2 English cucumbers, sliced

Throw all of the ingredients into a food processor, and blitz until well combined but they still have some texture. This makes about 1 1/2 cups of tapenade, which is enough to dollop on at least two English cucumbers.


Hand held salad of bitter greens with a citrus vinaigrette

Hand Held Salad of Bitter Greens

1 head of romaine, leaves separated

2 bunches arugula, coarsely chopped (try to find the large leaves, not the baby arugula)

2 endives, sliced

1/2 cup dried cranberries

1/2 cup pistachios, coarsely chopped

1/3 cup crumbled blue cheese

2 Tbs lemon juice

1 Tbs orange juice

1 1/2 tsp honey

1 tsp dijon mustard

1/2 cup olive oil

First, make the vinaigrette: mix together the lemon juice, orange juice, honey, and mustard, together with a generous amount of salt and pepper. Whisk in the olive oil until the vinaigrette is thick and creamy, then set it aside. (I do this in a plastic container, and just shake everything vigorously.)

When you are ready to serve, lay the romaine leaves on a platter, with the stems facing out - that is how your guests will grab the salad. If the stem is too long, you can cut the lettuce leaf so it fits on the platter. Place some salad in each lettuce leaf - it won’t be perfect and will probably look, um, exuberant. Watch it disappear.


Gravlax with Horseradish Sour Cream

Gravlax in the background, and a rare latke sighting in the foreground, because they disappear as fast as they land on the table.

***Note - start the gravlax at least two days before serving

2 one-pound filets of salmon of the same size

1 large bunch of dill

1/3 cup sugar

1/3 cup salt

1 Tbs pepper

1/2 cup sour cream

2 Tbs chopped chives

1-2 Tbs prepared horseradish

Combine the salt, sugar, and pepper. Lay one of the salmon filets in a dish, skin side down, cover with half of the salt mixture, and press it into the flesh. Place the bunch of dill on the flesh. Cover the flesh of the other salmon filet with the rest of the salt mixture, and then flip it over and place it on top of the dill, so that you have a sandwich of the salmon, with the dill in between, and the skin of the salmon facing out on the top and bottom. Cover the entire dish with foil, then put it in the refrigerator, and weigh it down. (I use old law books). Uncover and flip the salmon every twelve hours. Let the salmon cure at least two days - I’ve let it cure for as many as five days.

The day you’re planning to serve the gravlax, remove all of the dill. Slice the salmon on each filet thinly against the grain.

Stir together the sour cream, horseradish, and chopped chives, along with some pepper. Taste and adjust the horseradish to your taste. (It also might need some salt.)

Serve with latkes, or bread, or crackers, or really any carbohydrate vehicle for all of the deliciousness.

Fancy donuts!

Blackened Chili Lime Chicken

Hope Korenstein

Some people devote their lives to finding a cure for cancer.  Others work tirelessly to end childhood hunger.  I seem to be devoting my life to creating delicious, crunchy, and flavorful chicken with a minimum of work.

I am sort of embarrassed to say that this recipe took me a year to develop.  Not because I spent that time meticulously measuring spices, figuring out exactly the matrix that would produce the best flavor, but because I vaguely decided I wanted to do something easy with citrus and chili, but couldn’t figure out what that “something” was.  First I tacked Asian, dabbled in coconut milk, lime juice and Thai chilies, then veered Latin and tried various marinades.  All of those dishes probably could have turned into something good, but I wasn’t feeling it.  The sauces I created just weren't doing it for me.

IMG_1359.JPG

So then I hit on a dry rub.  But before I give you the recipe – and, trust me on this one, it is ridiculously good – first I have to talk about flavors that I do not like.  I’m pretty sure this is something I’m not supposed to do.  I’ve read lots of cookbooks and food blogs, but I’ve never, ever, seen anyone talk about things they don’t like to eat.

I get it: one man’s tuna fish is another man’s cat food, and no one wants to piss off a reader.  But I mean absolutely no offense when I tell you that I do not particularly like smoky flavors in my dry rub (or in most other places).  Almost invariably, dry rubs have smoked paprika.  Mine does not.  (For the record, I also hate smoked cheese.  And green peppers.  And okra.  But that’s about it.)

Without the smoke to muddy things up, the dry rub has a much cleaner citrus flavor, and the chili really shines through.  With garlic and coriander as supporting characters, the whole thing is really a symphony.  As always, the chili is to taste, and if you find it too spicy, you can add a bit more brown sugar to balance it out.   But I insist that you finish off the dish with a squeeze of lime juice.  It makes a huge difference!  You can make the rub ahead of time – I now keep a jar of it in my cabinet, at the ready when I need a quick and seriously yummy chicken dinner.

Blackened Chili Lime Chicken

3 tsps Ancho Chili Powder

1 ½ tsps. Garlic powder

1 ½ tsps. Mexican oregano (or regular, if you can’t find Mexican)

1 ½ tsps Coriander

¾ tsp Cayenne pepper

2 Limes, zested (the skin grated off)

3 tsps salt

3 Tbsps brown sugar

1 ½ pounds chicken breasts

2 Tbsp neutral oil, like vegetable oil

Directions

Mix together all the ingredients.  Rub on chicken.Heat oil on high heat in a large skillet, preferably a cast iron skillet.  Cook chicken quickly, until it is just cooked through and the chili lime rub is slightly blackened.

Squeeze lime juice over chicken and serve.

Serves two with leftovers.

Chocolate Chip Banana Bread

Hope Korenstein

A few years ago, I made some recipe or other that called for turbinado sugar.  I have no recollection of what the recipe was, or whether the turbinado sugar made the difference in its taste.  I do remember that I had to visit four stores before I found the damned sugar.  It was at one of those organic food stores, and I seethed at its exorbitant price, completely pissed off that I was dumb enough to spend hours looking for the ingredient, and far too committed at that point to pass up its purchase, even if the price was stupidly high.  

As it turned out, I was even dumber than I thought, since turbinado sugar is just a fancy name for Sugar in the Raw, which is found at pretty much every food store at a reasonable price, and in those little brown packets at most coffee shops for the best price of all: free.  (Not that I'm advocating swiping a bunch of those packets or anything.)  

As it also turned out, I love turbinado sugar.  It comes down to size: turbinado sugar is to regular sugar what sea salt is to kosher salt.  So, when you sprinkle turbinado sugar on just about anything you are about to bake, it lends a really nice crunch.

Which brings me to banana bread.  Recently, I found myself in possession of some rotting bananas, and decided to bake bread.  (Of course, my surplus of rotting bananas kept coinciding with the hot, muggy weather that invariably shows up in May -- and that I just as invariably resent as unfairly premature -- but I digress.)  After playing around a little, I hit upon a seriously good banana bread, made almost ludicrously moist by the addition of sour cream, and extra flavorful thanks to the brown sugar and vanilla.  Plus, there are chocolate chips, because my feeling is that any banana bread that is good without chocolate chips is better with them.

But by far the best part of the bread wound up being the top, because the turbinado sugar made a burnished, delectably crunchy crust.

The only down side is that my kids have gotten so used to have chocolate chip banana bread around the house that they don't want to eat plain old bananas anymore.

Chocolate Chip Banana Bread

3-4 Bananas, smushed up 

1 cup white flour

1/2 cup wheat flour

3/4 cup brown sugar (unpacked)

1 stick butter, softened

1/2 cup sour cream

2 eggs

1 tsp salt

1 tsp vanilla

1 tsp baking soda

1/2 cup chocolate chips

2-3 Tbsp turbinado sugar

Directions

Preheat oven to 350.  Butter a loaf pan.

Cream butter and sugar together.  (I like using a hand mixer, but you can mix it however you like.  I will say that the more air you can beat in, the fluffier the bread.)  Toss in the eggs and blend well, then add the bananas, sour cream and vanilla.

Fold in the white flour, wheat flour, salt and baking soda.  Then fold in the chocolate chips.

Sprinkle the top with turbinado sugar, and bake until it is set, about one hour.

Makes one loaf.


Linzer Torte

Hope Korenstein

My grandfather – who was famous in my family for his malapropisms – once said, “You’ve got your four food groups: you’ve got your chopped liver, chicken soup, chicken, and dessert.”  Clearly, he was referring to the four courses of a meal, but he might just as well have been talking about the four major food groups of the Ashkenazi Jews.  I’ve never been to Eastern Europe – must less lived in a turn-of-the-century shtetl – but I think it’s pretty safe to say that it wasn’t exactly awash in fresh fruits and vegetables.  As near as I can tell, they had potatoes, onions, carrots, beets, and . . . more potatoes.  Plus chicken, and chicken, and chicken, and chopped liver, and chicken fat, and chicken intestines, and occasionally brisket.  That’s about it.  I don’t think they had ANY fresh fruit.  Maybe apples.  But, then again, maybe not.  As for spice, well, there doesn’t seem to have been any.  Certainly nothing approaching the zing of a chili pepper.

So, instead of wincing about all the less-than-delicious things they were constrained to eat (Shav?  Kishka, anyone?)  I think it’s worth celebrating the tasty things that they did create.  Take linzer torte.  It’s technically Austrian, but it’s pretty clear that it was also made by Jews who were trying to scrounge up dessert without the benefit of fresh fruit.  And it is delicious, one of my very favorites.

It’s also dead easy to make, I promise, so long as you make peace with the fact that your lattice crust will not look like Martha Stewart’s.  The dough is singularly lacking in elasticity.  I haven’t a clue why this is the case, since I know precisely nothing about the chemistry of baking.  All I can tell you is that it will be nearly impossible to keep the strips of dough from breaking, much less weave an real lattice crust.  On this one issue, it is required that you have a come-to-Jesus moment.  Do some deep breathing exercises, or meditate, or listen to some Traveling Wilbury’s: do whatever you need to do.  Then smile, because in very short order you will have a really great dessert that pairs perfectly with a cup of coffee.

One more thing: please use really good quality raspberry jam.  It really does make all the difference in the world in this dish.

LINZER TORTE

1 cup hazelnuts (or hazelnut flour, if you can find it)

1 1/4 cups flour

¾ cup sugar

½ tsp cinnamon

¼ tsp nutmeg

1 orange (the zest of it)

1 stick of butter

1 egg

1 ¼ cups seedless raspberry jam

½ tsp vanilla

Directions

Preheat oven to 400.

Butter a 9 inch tart pan with a removable bottom (I just use the paper from the stick of butter and wipe it all around the pan until it is thinly coated)

If you are using hazelnuts, throw them in a food processor and grind them up until they are flour-like.  If you are using hazelnut flour, just throw it into the bowl of a food processor.  Then add the flour, sugar, cinnamon, nutmeg, orange zest, egg and stick of butter, and combine until it forms a ball. 

Dump the dough out onto a counter.  Roll it out between two pieces of waxed paper (so it doesn’t stick to everything).  Using about 2/3 of the dough, line the bottom of the tart pan with the dough, and make sure it goes all the way up the sides. 

In a bowl, mix together the jam and the vanilla, and pour it into the tart, making sure it spreads evenly throughout the tart.

Cut the rest of the dough into ¾ inch wide strips.  Lay them on top of the jam, and press each strip into the dough at the sides of the pan.

Bake until browned and bubbly, about 30-45 minutes.

Moussaka

Hope Korenstein

I have this weird, Betty Crocker-esque obsession with casseroles.  It’s probably because -- much as I prefer my fruit wrapped in some type of crust or pastry -- I secretly prefer my vegetables covered in cheese and dripping with sauce.  Plus, there is the leftover factor.  Unless you're feeding a crowd (which is, admittedly, an excellent use for casseroles), invariably there will be lots of leftovers.  And I love leftovers!  My tendency is to stick things in the freezer and then forget about them, which might at first blush sound like a bad habit, but I actually like the element of surprise in defrosting some foil-wrapped mystery on a random Tuesday night.   

Unfortunately, many of my favorite casseroles are a gigantic pain the neck to prepare.  I'm thinking here of moussaka.  Moussaka is a fantastic Greek casserole with eggplant and potato layered with spiced lamb or beef and a cheesy bechamel.  But the preparation has been known to bring even the most intrepid cook to her knees.

Which brings me to my Big Eggplant Beef.  There are way too many recipes out there that insist that you first salt the eggplant for anywhere from twenty minutes to two hours to remove the bitterness, and then fry it.  It is fully insane to treat eggplant this way.  I’m not so much referring to the salting of the eggplant, although it has never tasted bitter to me, and I don’t see the point.  If, however, you taste a difference when you salt eggplant, that’s okay by me. 

But I have to put my foot down when it comes to frying eggplant.  First of all, and I don't want to state the obvious, but eggplant is a large vegetable, so you're forced to fry it in batches, a procedure that has been known to take hours, or possibly days.  And don't get me started on the grease spatters, which are guaranteed to make a huge mess of the kitchen.  But the real horror of frying eggplant is that the vegetable will soak up nearly unlimited amounts of oil.  Cups of oil.  Horrifying amounts of oil.  The oil soakage can be avoided by breading the eggplant, which is a fresh and entirely separate nightmare that is also to be avoided at all costs.

Fortunately, there is an easy and delicious solution to the Big Eggplant Beef.  Brush eggplant slices with olive oil and roast them in the oven.  Do the potatoes the same way.  Done and done.

The meat sauce and the bechamel must be made in separate pots, which is more dish dirtying than I ordinarily like, but both are relatively easy to prepare.  You can do that while the vegetables are roasting, and then bake everything together.  There is some effort involved, but without frying the eggplant, it's not such a slog.  And the results?  Magnificent!

MOUSSAKA

4 large eggplants

3 large baking potatoes

cinnamon

garlic powder

1/3 cup olive oil

For the meat sauce:

1 large onion, chopped

4 cloves garlic, chopped

2 Tbsp olive oil

1 pound ground beef or lamb

3 Tbsp tomato paste

¾ cup red wine

1  tsp cinnamon

1 tsp oregano

For the cheese sauce:

3 ½  Tbsp butter

3  ½ Tbsp flour

3 ½ cups whole milk

2 eggs

½ cup kefalotyri cheese (or parmesan), plus another ½ cup  for the top

Pre-heat oven to 400 degrees.  Peel the eggplants and the potatoes, and slice the vegetables into roughly ½ inch slices.  Brush the eggplant and potato slices with olive oil, and season with salt and pepper.  Sprinkle cinnamon on the eggplant (trust me: it’s delicious) and garlic powder on the potatoes.  (You should have two very full sheet trays of eggplant and one very full sheet tray of potatoes, which you can fit in the oven all at once if you use all three racks.)  Bake until the vegetables soften and brown, about 30-45 minutes.  Flip them over about halfway through the cooking.  When you remove the eggplant and potatoes from the oven, reduce the heat to 350 degrees.

Meanwhile, make the meat sauce.  Add the olive oil to a hot pan, and sauté the onion with some salt until soft.  Add the meat and some more salt, along with garlic, cinnamon, nutmeg and oregano, until the meat browns.  Add the tomato paste, and cook until it darkens slightly in color.  Add the wine and cook it down until it disappears into the sauce.

For the cheese sauce:  In a pan, melt the butter and flour together until it forms a roux.  Add the milk, and whisk until it is incorporated into the butter and flour, and the sauce thickens slightly.  Season with salt and pepper.  Take if off the heat and let it cool a little, then whisk in 2 eggs and the cheese.

Assemble the moussaka:

At the bottom of a 9x13 lasagna pan, layer in the eggplant.  Sprinkle with half the meat mixture, then add the rest of the eggplant and the potatoes.  Sprinkle with the rest of the meat mixture, then pour the cheese sauce on top.  Sprinkle the remaining half-cup of cheese on top of the moussaka, and bake it in the oven at 350 until it is bubbling and the top is brown, about 45 minutes.  Let it sit for 15 minutes to settle before cutting and serving.

Serves a crowd.

Pasta with Shrimp and Roasted Tomatoes

Hope Korenstein

I'm really pleased with this recipe, because it solves two problems with one dish.  First, tomatoes.  I love tomatoes.  Lots of people will only eat tomatoes in August and September -- when they are in season -- but I refuse to deny myself tomatoes for ten months out of the year.  The only problem with this position is that the tomatoes in the winter and spring are mostly tasteless, if not actively bad.  There are exceptions: Campari tomatoes, for one.  Grape tomatoes.  And this neat trick: take a bunch of plum tomatoes and roast them in a low oven for a couple of hours.  They get sweet and smokey and tomato-y, in the best possible way.  With very little extra help, they are delicious over pasta.

Which brings me to the solution to my second problem: shrimp.  I made a New Year's resolution to make my life easier.  As a single working mom, this is a goal at best aspirational and at worst delusional, so I decided to aim low.  I've probably mentioned that I love to eat shrimp but hate to clean it.  As part of the new New Year's regiment, I am giving up the annoyance of cleaning shrimp by buying only frozen, raw, peeled and deveined shrimp.  Buying frozen shrimp is not compromising on quality, since the vast majority of shrimp sold at fish markets all over the country have been frozen.  Plus, bigger is not always better when it comes to shrimp.  I actually tend to favor the less expensive medium-sized shrimp over those super-pricey jumbo suckers since, for a lot of recipes -- particularly pasta recipes like this one -- smaller shrimp integrates better into the sauce, and distributes more equitably over the pasta. 

That's really all there is too it.  Roast the tomatoes.  Sauté the shrimp in a bunch of garlic.  Cook the pasta.  Throw everything together with a little chicken stock and some of the pasta cooking water.  If you had some white wine lying around, a splash of that would be good. Basil is great with this if you can find some that isn't ruinously expensive.  And voila, dinner is served.


PASTA WITH SHRIMP AND ROASTED TOMATOES

2 ½ pounds plum tomatoes

2 Tbsp olive oil

salt and pepper

¾ pound pasta

1 pound medium sized shrimp, peeled and deveined

3-5 cloves garlic, chopped

1 tsp red pepper flakes

3 Tbsp olive oil

½ cup chicken stock

1 cup pasta cooking water

1 cup basil, thinly sliced (optional, but very nice)

A few hours or a day before dinner...

Preheat oven to 325 degrees.  Slice the tomatoes in half length-wise and arrange them, cut side up, on a baking sheet.  Drizzle with olive oil, salt and pepper, until the tomatoes are nicely coated.  Roast in the oven for 2 hours.  When the tomatoes come out of the oven, coarsely chop and set aside.

When you are ready for dinner...

Bring a large pot of heavily salted water to a boil.  Add the pasta.

In a pan large enough to hold the pasta, heat the olive oil, garlic and red pepper flakes.  When the garlic is just fragrant, add the shrimp and cook until it is just pink.  Then add chicken stock, roasted tomatoes, pasta cooking water and extremely al dente pasta.  Cook everything together for a minute or two, then serve, topped with basil.

Serves two with leftovers.

Zatar Crusted Chicken

Hope Korenstein

I eat everything.  There's very little I don't like, and even less I won't try.  As it turns out, this is both good and bad.  It's good because I'm portable, you can take me anywhere, and I'll happily eat whatever is available.  It's bad because, well, I eat everything, so periodically my clothes don't fit and I'm forced to stop eating quite so much of the everything that I seem to like to eat.

But I understand that I am very much in the minority in this regard.  Everyone I know either eschews entire categories of cuisine (sushi, Korean food, barbecue) or else has some type of dietary restriction (gluten free, kosher, vegetarian).  Which is why I'm particularly enamored of this easy chicken dish, since it's really tasty, and also happens to be kosher.

This is revelatory, because when I was a kid, "kosher" and "tasty" were pretty much mutually exclusive.  Kosher food was rubbery chicken, salty meat, overcooked vegetables and -- at the occasional dairy meal -- cheese that bore a striking resemblance to plastic. 

That was a long time ago (longer than I care to admit) and now there is plenty of food that is both delicious and kosher.  I'm glad to add to that list this chicken, coated in zatar and served topped with a lemony, cumin-spiked salad.

First, a word about zatar.  I have to preface this by saying that no one gets more annoyed than I do when some jackass starts talking about how everyone absolutely must run to the store and buy some really exotic fruit or vegetable.  That kind of crazy talk has been known to commence some sort of deranged urban hunting trip where hoards of yuppies visit ever more expensive grocery stores in the hopes of finding the coveted ingredient.  Usually, whatever it is can’t be found in the continental United States, on account of the harvest just ended and the bumper crop won’t appear for another three months.  Even if it can be found, no one has the slightest idea how to tell if the thing is even ripe, or which parts of it are edible.

But when it comes to spices, my own feeling is, the weirder, the better.  First of all, spices aren’t hard to find, since they can be readily ordered on-line (at www.penzeys.com, among other places).  There’s no issue about ripeness, or edibility.  Spices last a few months, so there’s no pressure to use them immediately.  They generally aren’t too expensive (I’m looking at you, saffron), and they don’t take up much space.   And certain spices can be the thing that makes a pretty good dish truly great.  So yeah, I’ll encourage some weird spice use here and there.

Like I’m about to do for zatar (and sumac, which you'll be able to find wherever you find zatar).  It’s a Middle Eastern spice blend containing sesame seeds, sumac, thyme, and crack, I think, because it is so addictive.  It’s often used to top pita bread, but it’s also great here.  This is basically just a variation on my favorite meal, generically titled: Crunchy, Flavorful Chicken Topped with Salad.  I could eat some version of that meal every night…

ZATAR CRUSTED CHICKEN

1 ½ pounds chicken, butterflied (in other words: cut halfway through the thickness of the breast)

2 ½ Tbsp tahini (found in most supermarkets)

1 large clove of garlic, minced

Juice of 1 lemon

salt

Crust

3 Tbsp zatar

3 Tbsp sesame seeds

1 Tbsp flour

2 tsp sumac

1 tsp garlic powder

generous pinch of salt

2-3 Tbsp olive oil, for the pan

Salad

1 bunch arugula, roughly torn up

2 Persian cucumbers, chopped

½ small red onion, chopped

Vinaigrette

1/3 cup olive oil

2 Tbsp lemon juice

½ tsp cumin

salt and pepper to taste

Combine the zatar and other dry ingredients on a plate.  Combine the tahini, garlic and the juice of the lemon in a bowl.  If it seems too pasty, add a splash of warm water.

Dunk each chicken breast into the tahini mixture until it is coated.  Scrape off any extra with the back of a knife.  Then coat with the zatar/sesame seed mixture, and gently shake off any excess.

When a large pan is hot, add the olive oil, and sauté the chicken breasts until they are browned on both sides.  Turn them over carefully, so the crust doesn’t get disturbed. 

Meanwhile, combine the arugula, cucumbers and onions in a bowl.  Whisk together the olive oil, salt, pepper, lemon juice and cumin, and dress the salad.

Serve the hot chicken with the arugula salad on top. 

Serves two with leftovers.

Pasta with Cauliflower and Hazelnuts

Hope Korenstein

I think I’ve mentioned that my kids don’t eat real food, which might be okay if they didn’t refuse to eat things that are objectively delicious.  For example, my daughter won’t eat pizza.   And we live near some of the most awesomely delicious pizza on the planet.  But my daughter won’t go near it.  In fact, she’d be more likely to enjoy bad pizza – that kind that seems like it’s coated in American cheese, slathered in something that tastes suspiciously like ketchup.  My daughter would probably love that crap.  Listen: my kids won’t eat eggs!  And eggs are delicious!  So clearly, my kids are insane.

 But, sometimes, I have to admit that they have a point.  For instance: my kids won’t touch cauliflower.  It’s tempting to think that cauliflower just has an image problem, but I finally realized it’s something different: sensory mismatch.  Intuitively, if something smells good, it’s supposed to taste good, and if something smells bad, well, best not to put it in your mouth.  This isn’t always true, of course.  I can’t be the only person who, at the age of 13 or 14, became so enchanted with the smell of vanilla extract that I took a tiny sip of what turned out to be a vile-tasting liquid.  Cauliflower has the inverse problem; the sad truth is that the smell of cooked cauliflower is pretty much the opposite of mouthwatering.

 Which is a real shame, because it tastes delicious, particularly in this super easy pasta recipe.  I roast the cauliflower in the oven, and cut it so that the flat sides of the vegetable get browned and nutty tasting.  Toss it with some garlic and toasted hazelnuts, along with a whole blizzard of parmesan and parsley, and you have pasta heaven.

 One more thing:  I also tried this recipe with bacon.  I actually liked it better without the bacon.  It’s hard to convey how shocking was this turn of events, because up until that point, I was a firm believer that everything tastes better with bacon.  Score one for the vegetarians!

PASTA WITH CAULIFLOWER AND HAZELNUTS

¾ pound short pasta

1 head cauliflower, cored and cut into medium sized chunks

½ cup hazelnuts

4 cloves garlic, minced

1 tsp red pepper flakes, or to taste

5 Tbsp olive oil

½ cup chicken or vegetable stock

½ cup parmesan cheese

1 head of parsley, chopped

Preheat the oven to 400 degrees.  Toss the cauliflower with 2 Tbsp olive oil, salt and pepper and roast until the cauliflower browns, about 20-30 minutes.

When the cauliflower is almost done, bring a pot of heavily salted water to a boil.  Boil the pasta until it is al dente, reserving about 1 cup of the pasta cooking water.

Meanwhile, in a hot pan big enough to hold all of the pasta, add the hazelnuts.  When they are golden and fragrant, remove them from the pan, and add the rest of the olive oil, along with the garlic and red pepper flakes.  When the garlic is fragrant, add the cauliflower, straight off the roasting pan, along with the stock, the pasta and a few splashes of pasta cooking water.  When the sauce starts to thicken, add the hazelnuts, parsley and parmesan cheese, toss together, and serve with more cheese on the table.

Serves two with leftovers.

Balsamic Grilled Chicken and Goat Cheese

Hope Korenstein

BALSAMIC GRILLED CHICKEN AND GOAT CHEESE


For most of the summer, I had been marinating chicken in soy sauce with some other stuff, or mustard with some other stuff, or mustard and soy sauce, and then throwing it in the grill pan or under the broiler.  And it all worked okay…

 Until suddenly, I was completely bored and had to do something different with chicken.

But it still needed to be easy and relatively painless to prepare.  I pawed through my cabinet, looking for something to give the chicken some life, and hit upon the balsamic vinegar, which has this amazing ability to be both sharp and almost syrupy.  (There is a restaurant in New Jersey that has the most incredible chicken containing, among other things, balsamic vinegar, and my uncle -- who flatly refuses to eat chicken in any form -- loves this dish.  The recipe for the dish is a big secret, and I've never been able to figure out what else their incredible chicken contains, which is a constant source of frustration.  But I digress.)   I also decided that I wanted to use goat cheese, since goat cheese and balsamic vinegar are pretty much the peanut butter and jelly of the salad world.

In a bid to get some extra flavor into the chicken, I whisked some of the goat cheese into the marinade for the chicken, which wound up being one of the smarter decisions I've made in recent memory.  The goat cheese melts right into the marinade, and actually makes the chicken really tender and slightly tangy, all in a very good way.   I also threw in some garlic, maple syrup, and lots of black pepper.  I'm of the opinion that black pepper is never a bad thing, but even if you're not a huge fan of black pepper, put a little more than usual into the marinade, because it plays really well with the other flavors in this dish.  It might not be the most revelatory salad you've ever tasted, but it's pretty addictive.  Of course, you can put whatever you want into the salad, but please don’t omit the goat cheese – either from the salad or the chicken.

BALSAMIC GRILLED CHICKEN AND GOAT CHEESE

1 ½ pounds chicken breasts or thighs

For the marinade: 

¼ cup balsamic vinegar

1 Tbs maple syrup

2 cloves garlic, minced

¼ cup olive oil

2 tsp goat cheese

salt

generous amount of ground pepper

For the salad:

2 bunches arugula

1 small disk goat cheese (minus the spoonful for the marinade.  I like to use pepper crusted goat cheese)

1 roasted pepper, torn into strips (You can used jarred in a pinch)

1 small cucumber, cut into disks

Whisk together all of the ingredients of the marinade.  Reserve half, and toss the other half into a plastic ziplock bag with the chicken.  Marinate for a few hours, or overnight.

When you are ready to eat, toss together the arugula, roasted pepper, cucumber and goat cheese with the rest of the marinade.

Broil the chicken under the broiler, or grill it in a grill pan, until it is just cooked through.  Slice and serve atop the salad.

Serves two with leftovers.

Sesame Crusted Tuna with Cucumber Ribbons and Ginger Ponzu Sauce

Hope Korenstein

I’m a pretty organized person, so a trip to the grocery store sometimes feels like a military operation.  I get an email every week with my supermarket’s specials, and I plan the weekly menu around what’s on sale.  Then I draw up a grocery list, but at the store I am prone to grabbing bright, shiny objects – like, say, a piece of delicious, expensive, cheese, a basket of equally expensive figs, or a tray of not-too expensive but lethal for my diet cupcakes – and toss them into my cart with abandon.

On several occasions, this behavior has led to chaos in my bank account.  Then, when my pants don’t fit, I can’t afford new ones.  So I write the list, and try really hard to stick to it.  This is also handy because I have kids, so when they ask for approximately 40,000 kinds of junk food, I can tell them that it isn’t on the list, so we can’t buy it.  Fortunately, they can’t read yet, so they have no way of knowing if I’m lying. 

But a few weeks ago, my list got blown to hell.  It wasn’t my fault, actually.  I had done all of the shopping – sticking to my list – when I realized that I had forgotten something.  I ran back through the store, picked up what I was missing, and I was headed back to my family – who was already at the check-out line – when I saw that sashimi grade tuna was on sale at a ridiculous price.  There was nothing about tuna on sale in the email I had received with the weekly specials, and I know that this is true, because if tuna had been in the email, it would have been on my list.  Without even breaking stride, I bought a pound, but I didn’t have time to figure out what I wanted to do with it, or pick up anything to accompany it.

With tuna of that caliber, there are really only two options: raw or barely seared.  Since I had a big container of sesame seeds, I decided on barely seared.  I probably would have done this with a little radish slaw, or maybe some greens, but I didn’t have any of those things.  I took an English cucumber, peeled it, and then kept peeling ribbons off the vegetable until I got down to the seeds.

Then all I needed was a little sauce to dress the tuna and cucumber.  I had ponzu sauce, which is available at every grocery store now, and is less salty and brighter than soy.  I mixed in some fresh ginger and sesame oil.  Voila!  It was awesome, but I can’t take much credit.  It’s pretty easy to create a restaurant grade meal when you have as fine an ingredient as that tuna.  My only regret was that I didn’t make some sushi rice to go along with it… 

One last thing: I only made a pound of fish, which was enough for dinner for two.  This is, sadly, not the kind of meal where you want leftovers.

SESAME CRUSTED TUNA WITH CUCUMBER RIBBONS AND GINGER PONZU SAUCE

1 pound sashimi grade tuna

¼ cup sesame seeds

salt and pepper

1 Tbsp vegetable oil

1 English cucumber

¼ cup ponzu sauce

1 tsp grated ginger

1 ½ tsp toasted sesame oil


Sprinkle the tuna with salt and pepper, then press the sesame seeds into both sides of the fish. 

Heat vegetable oil in a pan over medium-high heat.  When it is hot, sear the tuna.  Do NOT overcook it!  Tuna should be served raw almost all the way through, with only a thin sear of cooked fish on each side.  About 2 minutes per side should do it. 

Meanwhile, peel the cucumber, then continue to peel long ribbons of the flesh until you get to the seeds.  Discard the seeds, and place the cucumber ribbons in a bowl. 

In another small bowl, mix together the ponzu sauce, sesame oil, and grated ginger.

Thinly slice the tuna, then arrange with cucumber ribbons.  Spoon some sauce over the whole thing.  Serve with sushi rice, if you like. 

Serves two without leftovers.

Kale Salad

Hope Korenstein

A few years ago, everyone started talking about kale.  It was healthy! It was awesome!  It cured cancer!  You’d have to be an idiot not to eat kale!  So, being an idiot, I bought some kale.  I bought the curly kind of kale, and cooked it the way I frequently cook leafy greens; sautéed in a pan with some garlic and red pepper flakes.  When it looked done, I tried some.   It tasted like a box of hair.    That finished me for kale for quite some time. 

Until a couple of months ago.  I was in my fruit and vegetable place, and I saw something on sale that looked gorgeous.  Dusty green leaves with a lacey pattern.  The sign said “Tuscan kale.”  And, since the whole bunch only cost $1.99, I went for it.

Why in god’s name don’t people differentiate between Tuscan kale and the other kind of kale?  Tuscan kale tastes absolutely nothing like hair.   It’s great sautéed, alongside some chicken or fish, but it’s positively addictive raw, with a lemony vinaigrette, a blizzard of parmesan cheese and some crunchy croutons.

The secret to this salad is to dress it generously, and early.  Unlike most salads, this one tastes better when the vinaigrette really soaks into the kale, so I usually try to slice the kale (thinly) and dress it a few hours before serving, and then throw in the croutons and parmesan at the last minute.

One last word about croutons.  You can buy them, of course, but if you have some leftover baguette going stale on you, it’s so easy to make them, and they will taste much, much better than anything you can buy.  Plus, it’s a neat way to recycle stale bread.  And, they freeze well!

KALE SALAD

1 bunch of kale, washed and dried

1 lemon

¼ cup best olive oil

3 Tbsps good quality parmesan cheese

½ stale baguette

2-3 Tbsps regular olive oil

salt and pepper

A few hours before you plan on serving the salad, whisk together the juice of the lemon (you should get about 3 Tbsps from the lemon), salt and pepper and the best-quality olive oil.  Thinly slice the kale into strips (it should look almost like a slaw), and toss with some of the lemon vinaigrette, until the kale looks moist.  Set everything aside.

Preheat oven to 400 degrees.  Cut the stale baguette into cubes and throw onto a cookie sheet.  Season with salt and pepper and toss with some regular olive oil.  Bake until the croutons are crunchy, about 5-10 minutes, and set aside.

When you are ready to serve the salad, grate the parmesan cheese over the kale, top with the croutons, and serve.

 Serves two.

Fish with Pumpkin Seed Salsa

Hope Korenstein

There’s a Mexican restaurant in my neighborhood that we visit a lot, because the food is terrific.  They have a salsa bar, where you can help yourself to a variety of condiments, like pickled vegetables (yes, please), or habanero salsa (too spicy, even for me), but by far the best thing on that salsa bar was the pumpkin seed arbol.  You could put that stuff on anything: stale tortilla chips, eggs, a cow pie, and it would taste great.

One day, the pumpkin seed arbol disappeared.  It wasn’t at the salsa bar.  It wasn’t on the menu. It was gone.

This was a devastating turn of events.  After a sufficient mourning period, I set out to reverse engineer the magic of the pumpkin seed arbol.  I found a recipe online that claimed to be from the restaurant, but had some suspicious items on the ingredient list, and went to work.  The toasted pumpkin seeds were easy enough, but I found that the arbol chilis packed a real punch, some I tempered them with some fruity ancho chilis.  Added sautéed onions and garlic, some vinegar and some water, and whizzed it all together.   The resulting salsa wasn’t quite the same as the original, but I still couldn’t stop dunking tortilla chips into it. 

You can serve this with chips, or put it on chicken, eggs, or, of course, burritos.  I decided to serve it on fish.  I just sprinkled some salt and pepper on a piece of flounder, dredged it in flour, and sautéed it in some olive oil, before topping it with the sauce and some pumpkin seeds for crunch.  It was no thing of beauty, but it was tasty.

PUMPKIN SEED SALSA

½ cup pumpkin seeds

1-4 arbol chilis, to taste (start with one, and work from there)

½ ancho chili (they are big)

1 Tbsp olive oil

3 cloves garlic

½ onion

3 Tbsp vinegar (I used apple cider vinegar, but you could use sherry or wine vinegar as well)

2-4 Tbsp water

salt

1 tsp sugar (if necessary) 

For the fish:

1 1/2 pounds flounder, or tilapia, or whatever is on sale

2 Tbsp flour

Salt and pepper

2 Tbsp olive oil

For the salsa

In a medium sized pan, toast the pumpkin seeds until they are just golden, then set them aside.  Coarsely chop the onion and garlic and add it to the same pan with the olive oil, and cook until the onion starts to turn golden and everything gets fragrant.  Cool slightly and add to the bowl of a food processor, along with the rest of the ingredients.  Start of with just a bit of the arbol chili, then blend everything together and adjust the heat and the seasoning to your taste.  Slowly add arbol chilis, and taste after each addition until you reach the level of heat that you want.  If the salsa gets too spicy, add a bit of sugar to even things out.  Then add water until you get the desired consistency. 

Serve with chips, as an accompaniment to tacos or burritos, or over fish or chicken.

If you are serving it over fish:

Heat olive oil in a pan large enough to hold the fish over medium heat.  Season the fish with salt and pepper.  Dredge the fish in flour, then saute in olive oil until golden on both sides, about 4 minutes per side, if the fish is a thin fish like flounder.  Spoon salsa over the fish, sprinkle with pumpkin seeds, and serve.

Serves two.

Buttermilk Coffeecake

Hope Korenstein

I am not a natural baker.  Great baking seems to require precise temperatures, careful measuring, and sifting.  I don’t have the patience for any of that.  Which doesn’t stop me from baking, often, since it is an undeniable fact that I love to eat cakes and cookies and muffins, frequently to my detriment.  It helps that I’m not terribly picky about what I’ve baked.  Chances are, it has loads of butter, sugar, vanilla, plus fruit or chocolate or nuts, or some combination of the three; what’s not to like?

The other reason that I bake a lot is that my kids love to help me bake, and we all have a great time.  They are at an age where it takes so little to please them.  When my son – with my help – dumps a teaspoon of vanilla into a bowl, then bounces up and down and grins because he is so pleased with himself, that experience becomes something that I try to replicate as often as I can.

So – since I think it probably goes without saying that I’m lazy – I’m always looking for a baking shortcut, some magical ingredient that will render my final product both light and moist, without the tedium of sifting or the frustration of trying to bring an egg to room temperature.  For a while, I was using a lot of sour cream, which does make cakes moist, but sometimes a bit heavy.  I’ve found a better dance partner now: buttermilk.

Being from a family of coffeecake lovers, I’ve long sought the perfect coffeecake.  Several of my family members are indifferent to chocolate (a gene that bypassed me entirely) but are helpless before a crumb topping.  Recently, I fed this cake to my family, and got rave reviews.  You must remember that this is a population who will never hesitate to tell me if something sucks, particularly something as important as coffeecake.  (I also fed it to my co-workers – and it was gone in about sixty seconds, accompanied by moans of pleasure – but the truth is that my co-workers will eat anything if it’s free, so I don’t put too much stock in that.)  This cake is not only moist, light and delicious, it appears to be pretty foolproof to boot.  The topping will survive without the nuts, but I love the pecans, and you could certainly substitute walnuts, or any other nuts you have on hand. 


BUTTERMILK COFFEE CAKE

 2 cups all-purpose flour + 1 Tbsp flour

1 scant cup of sugar

1 tsp salt

10 Tbsp unsalted butter, softened and cut into small pieces

3 Tbsp unsalted butter, melted (no, this is not a typo, I listed the butter twice)

1 tsp baking powder

½ tsp baking soda

¾ cup buttermilk

1 extra-large egg

2 tsp vanilla

1 Tbsp lemon zest

2/3 cup brown sugar

2 tsp cinnamon

½ cup pecans


Preheat oven to 350.  Butter a 9-inch springform pan.  (I just take the wrapper from the butter cube and smear it all over the pan to grease it.)   Sprinkle with the 1 Tbsp of flour and shake it around to coat, then dump out the excess.

In a dry pan, toast the pecans just until they are fragrant.  Cool, and then chop them up.   (I chop them by dumping them into a ziplock bag and then whacking the bag with a rolling pin until the nuts are crushed.)  Set the pecans aside.

Put flour, sugar and salt in a bowl.  Add the softened butter, cut up, and rub the butter into the flour mixture with your fingers, until it resembles coarse meal with some small clumps.  Set aside 1 cup of the mixture.

Mix baking powder, baking soda, buttermilk, egg, vanilla and lemon zest into the remaining flour mixture and beat together with a wooden spoon.  Pour into the springform pan.

Add the pecans to the leftover cup of the flour mixture, along with the brown sugar, cinnamon and the 3 Tbsp of melted butter.  Stir together until you have coarse crumbs, then pour it on top of the cake batter, spreading it evenly.

Bake until a toothpick inserted in the middle comes out clean, about 45 minutes.  Cool completely and serve.

Quinoa with Pine Nuts and Fried Shallots

Hope Korenstein

Why, exactly, are grains trendy?  I remember, about 20 years ago, bulgar wheat was all the rage, and you couldn’t go to a barbecue or pot luck (remember, this was the 90s) without someone bringing a big bowl of tabbouleh.  I never really understood why everyone was so excited about bulgar wheat, and I certainly didn’t miss it after it stopped being popular.

Now it’s quinoa, and everyone is wetting themselves with joy because it has a lot of protein and is apparently quite healthy.  My first experience with quinoa was a pre-made salad at a place near my work that contained, among other things, a pile of red quinoa.  It tasted like sand.  That was my last experience with quinoa for a really long time.

But then my sister started talking up quinoa, and she tends to know what she is talking about.  (Also, she’s my older sister, so I can’t help but pay attention to what she says.  Old habits die hard). 

The quinoa I found in my store was sand-colored, which was not confidence inspiring.  But, when I cooked it like rice – with two parts water to one part quinoa – it came out fluffy and nutty, just like my sister promised.  While it was hot, I added a big shot of fresh lemon juice and my most expensive, fruitiest olive oil.  Then, I mixed in some tasty stuff: toasted pine nuts and fried shallots.

Let me just say a word about fried shallots.  Normally, I oppose frying at home.  I blame Hannukah for this state of affairs.  Every year, someone has a Hannukah party, and fries potato latkes, and then their house smells like burned oil for eleven and a half months, until shortly before the next Hannukah party.  Plus, frying is messy.  But if you thinly slice some shallots and toss them with a bit of flour, they will crisp up in a pan in about ¼ inch of oil.   The shallots turn golden before the oil can stink up the house.  There is very little mess, and they are ridiculously tasty.  In fact, only about half of the shallots I fried made it into the quinoa, since my husband kept eating them off the paper towel, where I had left them to drain.

When I asked my husband about the final dish, he shrugged and said, “It’s food,” which is hardly a ringing endorsement, but at this point I must mention that I served the quinoa with a green salad and a steak, which my husband loves.  We had leftover steak, and leftover salad, but no leftover quinoa.  Zero.  So, if I haven’t previously established that my husband doesn’t know what the hell he’s talking about when it comes to food, I think I have now.   

One more thing: I’ve made this a few times now, with different vegetable additions: once I threw in some sautéed greens, feta cheese and sliced scallions; another time I added roasted squash (which is the picture you see).  It always comes out tasty.  So, you can certainly throw vegetables or cheese into the mix, but in my opinion, the shallots and pine nuts are what makes this dish, so please don’t leave them out.

 QUINOA WITH PINE NUTS AND FRIED SHALLOTS

 1 cup quinoa

¼ pine nuts

2-3 shallots, thinly sliced

2 Tbsp flour

Vegetable oil

1 lemon

2 Tbsp best quality olive oil

2 Tbsp regular quality olive oil

Salt and pepper

Roated butternut squash (optional)

Cook quinoa according to the instructions on the package.  I cook it like rice, with a ratio of one part quinoa to two parts water.

While the quinoa is cooking, toast the pine nuts in a large dry pan until they are golden.  Watch the nuts carefully, because they will burn quickly.  When they are golden, remove them from the pan and set aside.  In the same pan, heat enough vegetable oil to coat the pan.

Dump the flour on a plate and add salt and pepper.  Coat the shallots in the flour and then fry in the pan until they are crunch and golden, moving them around and flipping them so that they don’t burn.  When they are finished, remove the shallots and set them to drain on paper towels.

When the quinoa is just finished and very hot, toss it with the juice of the lemon (you should get a couple of tablespoons of juice), a few tablespoons of your best olive oil, and a big sprinkle of salt and pepper.  Then toss it with the shallots and pine nuts, and serve either hot or at room temperature.

Serves two with leftovers.

Korean Barbecued Beef Lettuce Wraps

Hope Korenstein

My husband is a real lover of meat and potatoes, in a way that I simply am not.  Don’t get me wrong.  If my day includes a hamburger – cooked rare, as god intended – then that is a very good day in my book.  But weeks can go by without red meat, and I don’t feel an absence; there’s too much other stuff to eat to miss it at all.

 Even still, meat hits the dinner rotation slightly more than I would otherwise choose, so I try to come up with new ways to cook it.  It’s spring now, and the days have been getting warmer, so I thought maybe I could make steak lighter.  (Which is an oxymoron, I know, but somehow it all made sense to me at the time.)

 That’s when I thought of bulgogi – it’s a Korean steak dish, where the beef is very thinly sliced, marinated in a chili-soy combo, grilled, and served in lettuce wraps.  (It was the lettuce wrap that was responsible for my thinking I could make steak “light.”)  Usually there is a Korean chili paste called Kochuchang along for the ride, as well as kimchi, and any number of other condiments.

 I kept it pretty simple, though.  My supermarket had tenderloin on sale so I used that, but you could easily use sirloin steak, or flank steak, or whatever looks amenable to tenderizing in a soy bath.  I stuck the steak in the freezer for about an hour, to make it easier to slice, and then thinly sliced that sucker.  (I made sure my husband wasn’t around to witness what I was convinced he would consider a desecration of a beautiful steak.)  I dumped some soy sauce, sugar, sesame oil, mirin and rice vinegar in a plastic ziplock bag.  A few hours later, I drained the marinade from the beef, and threw it for a few minutes into a screaming hot cast iron pan, to form some caramelization.  I wound up having to cook the meat in phases, so next time I’ll probably dump it all on a sheet tray and broil it.

 I made some rice, then rolled the rice and beef up in pieces of Boston lettuce – you could use whatever lettuce looks tender, and amenable to rolling.  (I don’t know when there is a time for iceberg lettuce – one of my least favorite food items – but this isn’t it.)

 The result was fantastic, and I have to give partial credit to the loveliness and tenderness of the steak to begin with.  But really, this will work with any number of cuts of meat.  And hell, it’s different from the usual salt-and-pepper treatment, and it left both me and my husband happy.  My kids, of course, wouldn’t touch it, but that’s a battle for another day.


KOREAN BARBECUED BEEF LETTUCE WRAPS

 1 ½ pounds steak

¼ cup soy sauce

1 ½ Tbsp brown sugar

2 tsp sesame oil

1 ½ Tbsp mirin or sherry

1 tsp rice vinegar

1 tsp sriracha (or to taste)

3 cloves of garlic, minced

1 inch piece of ginger, grated

4 scallions, sliced

1 ½ Tbsp sesame seeds

 1 head Boston lettuce, or any tender lettuce, washed with the leaves kept whole

Rice

 Directions:

Stick the steak in the freezer for about an hour.  When it is slightly frozen – I know, that sounds a little like slightly pregnant, so you’ll have to use your judgment – slice it as thinly as possible

 Dump the soy sauce, brown sugar, sesame oil, sherry, rice vinegar and sriracha into a ziplock bag.  Add the garlic and ginger.  Then throw in the sliced steak, and marinate anywhere from 20 minutes to a day.

 When you are about 30 minutes from dinnertime, cook the rice according to the instructions on the package, if you’re using it.  Drain the beef from the soy marinade, and quickly cook it in a really hot pan until it is just cooked, with some caramelized spots.  Alternatively, you can throw the beef on a sheet tray and broil it.  Top the beef with sesame seeds and scallions.

To make a wrap, place some rice and some beef in a piece of lettuce, roll it up, and enjoy!

Spicy Shrimp Tacos with Citrus Salsa and Creamy Avocado

Hope Korenstein


I might have mentioned that I have children, and that they eat next to nothing.  My son eats oatmeal.  Pretty much that’s all he eats.  My daughter eats chicken nuggets and pasta, but her diet principally consists of ketchup.  So when one of them eats something with any kind of food value, I get really excited.   Recently, my son started eating oranges, although I use the word “eating” loosely.  What he was actually doing was chewing on orange slices, sucking out the juice, and then spitting out little deflated orange balloons.  All over my house.  But still, I got very enthusiastic about his orange intake and I proceeded to buy about 10 pounds of different kinds of oranges.  At which point, of course, my son ceased all further ingestion of oranges, and I was stuck with a refrigerator full of citrus.

 So I decided it was the perfect time to revisit my shrimp/avocado/citrus project.  I love those three flavors together, but I could never figure out the right vehicle.  For a while I played with a salad, but the textures were all wrong – too uniformly slippery.  Lettuce didn’t help much.  Neither did toasted pumpkin seeds.

 Then I came up with the answer that was so simple that I can’t believe I didn’t think of it sooner.  Spice up the shrimp, stick them in a taco on a bed of some creamy avocado, top with a citrus salsa.  Perfect!  I actually used a blood orange (I told you I got enthusiastic about the oranges) and the color is lovely, but you are welcome to stick to oranges, with maybe a ruby red grapefruit thrown in. 

 I’ll tell you straight up, there are two annoying things about making this dish.  The first is my perpetual pet peeve: deveining shrimp.  You can buy them deveined, but I never want to spring for the added expense. The other annoyance is dealing with the citrus, because you have to remove all the pith and peel and stuff that my son was so fond of spitting out.  That involves a technique called “supremeing.”  Basically, you have to cut the ends off the citrus, and then use your knife to remove all of the pith and peel, leaving just the flesh.  Then you want to cut between each segment of the citrus, removing it from the thin membrane.  I am totally not a purist about this.  It doesn’t have to be pretty for it to taste good.  And, let me say this: it tastes delicious.  Something about the spicy shrimp, with the cool salsa and the avocado, is just really yummy.

SPICY SHRIMP TACOS WITH CITRUS SALSA AND CREAMY AVOCADO

 1 1/2 pounds shrimp, peeled and deveined

1 Tbsp olive oil

1 tsp chili powder

1tsp cumin

1 tsp garlic powder

½ tsp cayenne pepper (or more, if you like things spicy)

salt and pepper

 For the salsa:

2 oranges, segments removed

1 ruby red grapefruit, segments removed

1 blood orange, segments removed

1 Tbsp olive oil

salt and pepper to taste

2 Tbsp mint, chopped

 For the avocado

1 ripe avocado

1 lime

salt

 Tortillas


Toss the shrimp with the olive oil and spices and broil until just cooked, about 2-3 minutes per side.

Mash the avocado together with a sprinkle of salt and the juice of the lime, until it is a smooth paste and set aside. 

 Mix all of the citrus in a bowl together with the olive oil, salt, pepper and mint.

Assemble the tacos:  heat up the tortillas over a low flame or covered in a low oven until they are warm.  Spread with some of the avocado and then add some shrimp.  Top with the citrus salsa and enjoy!

Spicy and Sticky Tofu

Hope Korenstein

Recently, my day abruptly started at 5:09 a.m., when I heard my daughter shrieking that she had wet the bed.  She continued to scream as I changed her sheets, which woke up my son. (They share a bedroom.)   Which meant that, at 5:13 a.m., I had screaming in stereo.

Realizing that my son would not magically lie down and go back to sleep, I hauled him out of his crib and into the living room…where I saw that the cat had coughed up a hairball the size of my head, along with about a gallon of cat puke.   My husband, that coward, pretended to be asleep.

 It was 5:17 a.m.  And worst of all?  That night I had resolved to cook tofu for dinner.

I am both fascinated and repelled by tofu.  I once marinated tofu in a delicious and lip-burning chili-lime marinade for three days before broiling it.  It tasted like absolutely nothing.  I have never seen a food so impervious to flavor.  On the other hand, tofu is cheap, healthy, and its lack of flavor (at least theoretically) makes it versatile.  Plus, my fruit and vegetable place has home made blocks of tofu for a dollar, so I was sold.

People just do not get excited about a tofu dinner.  Since I tend to root for the underdog, I decided to give it another try.

It seemed necessary to give it a glaze, something sticky.  It seemed equally important to give the tofu some crunch, some texture, some spice.    I’m not proud: what I basically did was toss a whole bunch of spicy and salty Asian condiments into a bowl, along with some brown sugar, to make it sticky and to counter-balance the heat.  Then, I sautéed some garlic, ginger, sesame seeds and Szechuan peppercorns, to give it some layers of flavor and some crunch.   The tofu got coated in flour and browned, also for crunch-related reasons. 

Ironically enough, in my quest for a healthful dinner, I forgot…the vegetables.  The tofu dish came out great, but next time I’ll make it with some broccoli, for a different texture, and to soak up all that spicy stickiness.

 SPICY AND STICKY TOFU

 1 block tofu, cut into squares

3 Tbsp flour

salt and pepper

vegetable oil

 For the sauce:

 2 tsp garlic, chopped

2 tsp ginger, finely grated

½ tsp Szechuan peppercorns (optional, but tasty)

½ tsp hot red pepper flakes

1 Tbsp sesame seeds

2 Tbsp soy sauce

2 tsp sesame oil

2 tsp fish sauce

2 tsp brown sugar

sriratcha or hot sauce to taste

2-3 Tbsp water

1 cup of broccoli, blanched (I didn’t add this, but will next time.)

3-4 scallions, sliced

Handful of cilantro, chopped


If you are making rice, start it first.  You’ll be able to put the whole tofu dish together in the time the rice cooks.

 Heat vegetable oil on medium high heat in a pan large enough to hold the tofu.

 Dump the flour onto a plate and season it with salt and pepper.  Dredge the tofu squares in the flour, then sauté in the oil until the tofu gets slightly golden and crunchy.  Remove the tofu and set aside.

 If there seems to be a lot of oil left in the pan, drain some of it off and turn the heat way down to low.  Add the garlic, ginger, red pepper flakes, sesame seeds and Szechuan peppercorns (if using).  Saute until everything is fragrant, about one minute.  Add the soy sauce, sesame oil, fish sauce, hot sauce, brown sugar and water, and let everything simmer together for a couple of minutes.  Add the tofu back into the pan (and the broccoli, if you’re using it) and swirl everything around until the sauce coats it.  Taste and add more hot sauce, if you like things spicy.  Add the scallions and cilantro, and serve over rice.

Serves two with leftovers.

Pasta with Asparagus

Hope Korenstein


Spring has sprung, so that means asparagus is dirt cheap, and therefore a menu option.  Asparagus is one of those items that I never bother to buy when it’s expensive because, first of all, it’s expensive (duh) and, second of all, it’s just not going to taste very good when it’s out of season.  But in season, the quality improves just as dramatically as the price drops.  It’s one of the many things I love about cooking: can you think of anything else on earth that gets better as it gets cheaper?

 Before I digress into the many joys of discount shopping (which I was raised to believe was a sport), let me get back to asparagus.  Both my husband and I love asparagus, and it’s delicious tossed with olive oil, salt and pepper and rolled around in a hot pan until it’s bright green with a few brown crunchy bits.  Cook some chicken or fish, and dinner is served.  But on this particular evening, I didn’t have any protein to go alongside the asparagus.  Instead, I decided to make pasta.

 This is a very basic pasta recipe; you can do it with many other kinds of vegetables (broccoli, snap peas, etc.), and any liquid: I had white wine in my fridge, but you could easily use chicken stock or just a ladle of pasta cooking water.  But I must say, the asparagus was particularly good with the mint (which I happened to have on hand – obviously basil would be great as well), the squeeze of lemon, the blizzard of parmesan cheese.  Next time I make it, I’ll probably throw in some cubes of ricotta salata for a nice hit of salt and a different texture, or even crack an egg into the pasta right before serving, to make a yummy, carbonara-like sauce.  All of that would be nice, but this recipe is perfectly delicious just as it is.


PASTA WITH ASPARAGUS


1 pound asparagus, woody ends trimmed

3 Tbsps olive oil, plus some extra to toss with the asparagus

4 cloves of garlic, minced

½ tsp red pepper flakes

2 Tbsps mint, coarsely shredded

½ pound pasta

½ cup white wine

¼ cup good Parmesan cheese, grated 

Cook the pasta, and reserve 1 cup of the cooking water

Toss the asparagus spears with olive oil, salt and pepper.  Saute the spears in a hot pan – big enough to hold the pasta – until the spears are bright green, with some browned bits.  Remove the asparagus from the pan and coarsely chop into inch-length pieces.  Lower the heat on the pan all the way down.  Add the rest of the olive oil, and sauté the garlic and red pepper flakes until the garlic is fragrant, about 30 seconds.  Add the wine (or stock, or just cooking water), and cook for a minute until it is bubbling.  Toss with the pasta, asparagus and mint.  Sprinkle cheese on top and serve.


Serves two.

Chocolate Cupcakes with Raspberry Frosting

Hope Korenstein

When my tomboy daughter was three, she became obsessed with princesses.  She no longer responded to her own name, but asked that she be called Cinderella.  No outfit was complete without a tiara and a wand.  She favored big, poufy, dresses, which she called “ballerinas.”  And the pink, oh my god, the pink.  Everything had to be pink.


And although I had spent 40 years not thinking much about it, all of this turned me into a raving feminist.  I blame Disney.  Cinderella – a movie my daughter watched incessantly – might be the worst movie ever made.  Cinderella is pretty and has a nice singing voice, but she has no discernable personality.  Her stepsisters are unrelievedly stupid, ugly, talentless and mean, but Cinderella cheerfully complies with their relentless demands.  Cinderella’s mother is dead, of course, because in Disney ALL the mothers are dead.  (Why?  What happened to the writers at Disney that they feel compelled to kill off all of the mothers?  It’s disturbing.)  And her stepmother is downright evil.   Cinderella herself is so dumb that she doesn’t realize that the man she danced with at the ball – the only man at the ball – was in fact the prince.  The moral to the story is clear: if you’re pretty, and you wear pretty things, you can marry rich, and never have to do anything again for the rest of your life.   Which doesn’t sit well with the mom who grew up on “Free to Be, You and Me,” has a graduate degree and a full-time job, and thinks life is probably better that way, thank you very much.


So when my daughter’s fourth birthday rolled around, she of course wanted pink cupcakes.  She told me she wanted pink cake, but I interpreted that to mean chocolate cake, because she loves chocolate.  No problem there.  But when she said she wanted pink frosting, I knew she meant it.


The obvious choice would have been vanilla buttercream frosting with a few drops of red dye.  The trouble is that I really don’t like vanilla buttercream frosting.  It’s too sweet, too flat, too one-note.  So I figured there must be a way to give the frosting some flavor while turning it pink.


That’s when I thought of jam.  Sure enough, I dropped a few spoonfuls of seedless raspberry jam into the frosting, and backed off the sugar, and I had something more flavorful, less insipid, than plain old vanilla frosting.  And it was pink!  Joy all around.


The chocolate cupcake recipe I use is a Martha Stewart recipe I found that I’ve tweaked a little.  It’s my kind of recipe, because it basically calls for you to throw all the ingredients into a bowl and mix it together.  The vegetable oil threw me, I admit, as did the fact that the batter was so loose that I had to use a ladle to get it into the muffin cups.  There is no earthly reason why this recipe should produce moist, delicious cupcakes, but, by some magic trick, it always does. 

CHOCOLATE CUPCAKES WITH RASPBERRY FROSTING

 For the cupcakes:

 2 cups white sugar

½ cup brown sugar

3 cups all purpose flour

1 ½ cups unsweetened cocoa powder

1 Tbs baking soda

1 ½ tsp baking powder

1 ½ tsp salt

1 ½ cups buttermilk

¾ cup vegetable oil

3 large eggs

1 ½ tsp vanilla extract

3 Tbs brewed coffee

3/4 cup warm water


Preheat oven to 350.  In a large bowl, mix together sugars, flour, cocoa powder, baking soda, baking powder, and salt.  Add buttermilk, vegetable oil, coffee and water.  Blend together.  Then blend in eggs and vanilla.


Ladle batter into muffin cups (it will be very liquidy) and bake until a toothpick comes out clean, with crumbs, 20-25 minutes.  Let cool completely before frosting

For the frosting:

3 cups confectioners sugar

2 sticks unsalted butter

1 tsp vanilla extract

3 generous dessert spoons of seedless raspberry jam

2-3 Tbs heavy cream

Pinch of salt


Using a mixer (standing or handheld) blend all the ingredients together.


Frost completely cooled cupcakes.